Affiliate disclosure: We are reader-supported. This means that we may earn a commission if you buy an item using one of the links. For our reviews, we purchase products ourselves and review them independently. Read more about our methodology.
What is an AeroPress?
The AeroPress is a coffee press that can make espresso-like coffee and cold brew drinks. It doesn’t require electricity to use and only takes a few minutes to use.
As the name implies, it uses pressure as well as immersion and aeration to brew coffee. The AeroPress also includes a filter. Because of the filter, you can use a finer grind of coffee, which produces a stronger and more flavorful brew.
People like AeroPress because it is easy to use and clean, is portable, and allows you to make good-tasting coffee or cold brew quickly without a fancy machine. Since it’s small and doesn’t require electricity, it’s great to use while traveling or camping.
What comes with an AeroPress?
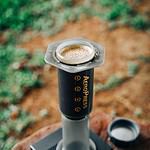
AeroPress has three parts and comes with a few accessories. The AeroPress itself is comprised of the following:
- Plunger: This presses the water through the coffee grounds to brew your coffee
- Chamber with numbers written on the side: This holds the coffee grounds and water. It holds approximately 250 milliliters or 8.5 fluid ounces of liquid
- Filter cap: This holds the filter to ensure no coffee grounds end up in your cup. It attaches to the chamber
AeroPress comes with a few accessories to assist the brewing process. These are:
- Paper filters: These are small disc filters that will sit in the filter cap. You can also buy a stainless steel reusable filter from AeroPress
- Scoop: This is a scoop that holds 11.5 grams / 2.5 tablespoons when level and 14 grams / 3 tablespoons when rounded. You'll use rounded scoops when brewing
- Stirrer: This is a stirring device you’ll use to make hot and cold brewed drinks
- Funnel (only part of certain bundles): This is a funnel you can put on top of the AeroPress which makes it easier to put in coffee grounds or pour water
How to make coffee with an AeroPress: Step-by-step instructions
Below we list the supplies, coffee grind size, and other information that is important to know about AeroPress before getting started.
| Supplies needed | Paper round disc micro-filters or AeroPress stainless steel filter |
| Coffee grind size | Extra fine to fine grind, depending on preference. An extra-fine grind will produce a richer taste but is harder to press |
| Coffee to water ratio | For coffee style:
For espresso style:
|
| Time to brew | 2-3 minutes |
Now that we’ve covered the basics of AeroPress, let’s go through how to use it. The instructions are for the standard use of an AeroPress. We cover alternative methods and uses further in the article.
1. Gather your supplies
You’ll need extra-fine to fine ground coffee and hot water for coffee or room-temperature water for cold brew. An extra-fine or espresso grind will produce a stronger, richer flavor compared to a fine grind. If you want to make a milk-based drink, gather milk of your choice and if you have one, a milk frother.
2. Remove the plunger and the filter cap from the chamber
3. Put a round disc filter into the filter cap and twist it onto the chamber
4. With the filter side down, set the AeroPress onto a mug or urn that you’ll brew your drink into
Depending on how much you want to brew, make sure your mug or urn can accommodate the amount of water you’ll put in the chamber.
5. Put one to four scoops of ground coffee into the chamber
One scoop makes one serving. The AeroPress can make up to four espresso-sized servings or one coffee-sized serving.
6. Shake the chamber to make sure the coffee grounds are level
This is an important step, because if the grounds aren’t level, water may drip through the filter before you press down the plunger.
7. Add water into the chamber up to the number corresponding to the number of scoops and style of coffee you are making
As an example, if you used one scoop and are making espresso-style, pour the water until it reaches one on the chamber. If you're making one coffee-sized serving, pour water to the four mark on the chamber.
For hot brews, AeroPress recommends water at 185 degrees Fahrenheit. If you don’t have a thermometer, we recommend boiling water and pouring it once it’s stopped bubbling for 30 seconds. For cold brews, use room temperature or cool water.
8. Mix the coffee and water together using the stirrer
Stir for 10-15 seconds for hot brews. Stir for 1 minute for cold brews.
9. Put the plunger into the chamber and press down gently until it reaches the coffee grounds
It can be tricky to get the plunger in. Therefore, we recommend using two hands to stabilize the AeroPress so you don’t spill hot water. If you encounter resistance, pause for a couple of seconds and then resume pushing. You shouldn’t press hard as this will block the flow of air and compress the coffee.
An extra-fine grind will be more difficult to press. If an extra-fine grind is too hard to press, we recommend using a fine grind instead.
10. Add finishing touches and enjoy!
After pressing the plunger down, you’ll be left either with espresso-style coffee if you used hot water or “cold brew” if you used room temperature water. For coffee, you can enjoy it as is.
Otherwise, add hot water to make an americano or add steamed or frothed milk to make your favorite espresso-style drink. For cold brew, add cold water and enjoy.
How to clean an AeroPress
Cleaning an AeroPress is easy. Once you’ve finished brewing, remove the filter cap from the chamber. Over a trash can or another receptacle, push the plunger all the way down. This will cause the used coffee grounds and filter to pop out. Rinse the filter cap and the end of the plunger off with water.
You can also rinse the inside of the chamber by removing the plunger, but the plunger should wipe clean the inside of the chamber when you push it all the way down. Make sure to rinse the plunger soon after brewing your coffee. This will help extend the life of the plunger. If you store the AeroPress in its bag, we recommend ensuring it’s dry before storing it.
It’s safe to put the AeroPress in the top rack of the dishwasher, but generally speaking, rinsing out the AeroPress is sufficient for day-to-day cleaning. AeroPress recommends occasionally removing the seal from the plunger and washing it with soap and warm water to preserve its lifespan. If the inside of the AeroPress ever gets sticky, wash it out with white vinegar.
Alternative uses and methods
Besides the standard instructions we outlined above, here are a few other ways to use an AeroPress.
AeroPress inverted method
To brew coffee using the inverted method, we’ve outlined the steps below. However, we’d like to note that this method is riskier as it’s easy to knock the AeroPress over and spill hot or scalding liquid on yourself. And as someone who has significantly burned herself with boiling water, it’s not an experience I would recommend. If you decide to use this method, proceed with caution.
1. Gather your supplies
You need hot water, fine ground coffee, and a filter for the filter cap. Make sure to put the filter in the filter cap. Your hot water should be just below boiling temperature.
2. Put the plunger in the AeroPress and flip it so the filter side is up
Put the plunger in the AeroPress around the number four on the chamber. After doing this, flip the AeroPress over so the side with the filter cap is facing up. Make sure the AeroPress is on a stable surface. The filter should not be on the AeroPress at this point.
3. Add coffee grounds to the AeroPress
Add coffee grounds into the chamber. We generally recommend brewing coffee style using this method, so use a 1:16 coffee-to-water ratio.
4. Optional: Wet coffee grounds with hot water and stir
Before you pour in all of the hot water, add a little to cover the coffee grounds in the AeroPress. Stir so that all of the grounds are wetted. Wait 30 seconds.
5. Add hot water to the chamber and stir
Pour in hot water to fill the chamber up to no higher than the number one. Stir to ensure that the water and coffee grounds are evenly mixed.
6. Let brew for one to two minutes
7. Attach the filter cap to the AeroPress and flip over with a mug
Attach the filter cap with a filter to the AeroPress. Place a mug upside down on top of the AeroPress and flip both over. We recommend doing this instead of flipping the AeroPress onto a mug to avoid spilling hot liquids.
8. Press the plunger down
Press the plunger slowly for about 20 to 30 seconds. If it’s difficult to press, wait a couple of seconds and resume pressing. Stop when you hear a hiss.
9. Enjoy!
If desired, add additional hot water or milk to your coffee to dilute it or create your favorite milk-based coffee drink.
How to use an AeroPress to make tea
You can make loose-leaf tea in an AeroPress using the inverted method described above. However, it’s not our favorite way to make tea. Instead, we recommend using a tea steeper in a mug or kettle to brew your loose-leaf tea.
Despite this, the AeroPress can work in a pinch if you only have loose-leaf tea and don’t have a tea steeper. You’ll want to let the tea steep for the recommended amount of time. After the tea steeps, twist the filter cap onto the chamber, flip the AeroPress onto a mug or urn, and then push the plunger down.
Be careful flipping the AeroPress over. We recommend putting the mug upside down onto the AeroPress and flipping it with the mug to avoid spilling hot water.


